HAProxy adalah singkatan dari High Availability Proxy, perangkat lunak GRATIS berfungsi sebagai penyeimbang traffic untuk aplikasi / Website yang berbasis HTTP/S atau TCP.
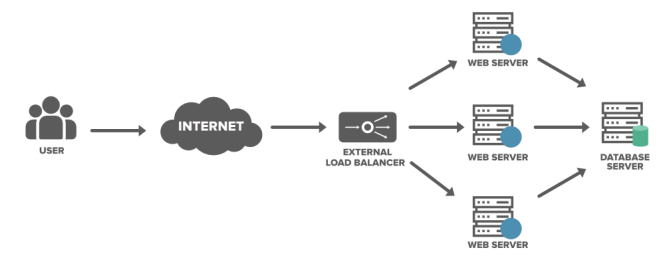
Sistem Haproxy bekerja membagi traffic pengunjung atau request masuk ke beberapa server backend (node1. node2,node3) yang tersedia. Sehingga beban server terdistribusi secara merata diantara server-server tersebut jika kondisi node hidup semua.
Manfaat utama jadi load balancer HAProxy mempertahankan situs tetap Online, tidak Down karena masalah teknik VPS bermasalah (maintenance), jadi jika ada 1 node Down maka node lainya akan menggantikan dikontrol oleh sistem load balancer.
Node atau server backend bisa dipilih dari beberapa lokasi vps data center semisal indonesia, singapore dan tokyo, tujuan menjaga kemungkinan masalah pada data center Down namun website tetap ONLINE.
Algoritma Load balancer HAProxy
Algortima atau Teknik load balancing yang sering digunakan adalah roundrobin dan least connection.
RoundRobin adalah cara yang menganggap bahwa semua beban server sama, jadi setiap server yang ada di akses secara bergantian dan berurutan, sedangkan Least Connection hanya mengalihkan beban ke server yang dianggap kosong atau trafficnya rendah.
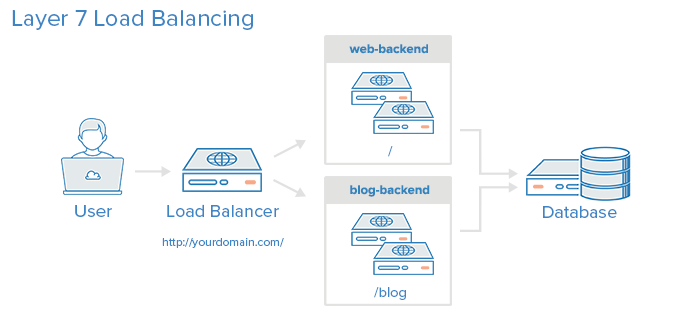
Setingan haproxy terdapat 2 bagian (side) yakni frontend dan backend. koneksi yang datang dari user akan di terima oleh bagian frontend untuk di olah/filter sesuai rule frontend, jika lolos maka paket di lanjutkan ke backend untuk di oleh/filter sesuai rule backend selanjutnya akan di putuskan untuk kirim ke node tertentu sesuai strategi yang di pakai backend. Jadi frontend hanya mengurusi client/users dan backend mengurusi node server.
Keunggulan HAProxy
Haproxy hanya menggunakan 15% dari processing time penggunaan CPU dengan HTTP close mode dan sekitar 30% jika menggunakan HTTP keep-alive mode. Itu artinya secara global haproxy mempunyai impact yang besar dalam performa namun kecil dalam penggunaan resource.
Fitur HaProxy
- Proxying : menjembatani koneksi dari client dan server.
- SSL : haproxy ssl support secure sockets layer (https)
- Monitoring : termonitor secara terus menerus dan tercatat
- High availibility : walaupun 1 atau beberapa web server mati masih tetap terkoneksi
- Load balancing : beban trafik yang terbagi sama rata atau sama rasa
- Stickiness : aliran data/paket yang melekat pada aturan/rule yang di setting
- Sampling and converting information : pengelompokan dan rekap data dari paket yang lewat
- Map : membuat simple rule untuk setting frontend dan backend
- ACLs dan Conditions :
- haproxy acl mengatur trafic dengan rule dan condition
- Stick-tables
- Formatted strings
- HTTP rewriting and redirection
- Server protection
- Logging : terdapat haproxy log file untuk maintenance
- Statistics : data statistic untuk monitoring trafic
Kelemahan Load balancer
Jika VPS tempat HAProxy Down semua Node, database tidak akan bekerja atau walaupun status UP, Solusi memilih penyedia cloud hosting Uptime 99.99% dan spek bagus untuk HAproxy.
Biaya Server lebih mahal karena harus sewa banyak VPS, setidanya 4-7 node backend (web server + database) dalam membangun 1 server + load balancer.
Desain Jaringan Load balancer HAProxy
- 1 vps ubuntu sebagai Proxy load balancer
- 2-3 vps Node -> server backend linux (install web server : apache / nginx)
- 2-3 vps node -> server database mysql, mariaDb.
Arsitektur pembagian IP & VPS:
- IP Public : 20.81.9.000 (Install HAProxy)
- 2 IP Public : Node_app 1, Node_app 2
- 2 IP Public : Node_db 1, Node_db 2
Spesifikasi minimal VPS : vCPU 2 core, RAM 2-4 Gb untuk masing2 cloud node & HaProxy spek bisa lebih tinggi, bisa upgrade berdasarkan kebutuahan traffic.
Install HAProxy VPS Ubuntu
Ubuntu server versi 18.xx – 22.xx saat ini paling stabil, masuk SSH:
sudo apt update
sudo apt install haproxy
Seting HAProxy
Konfigurasi HAProxy Auto On jika terjadi restart server:
nano /etc/default/haproxy
Tambakan kode:
ENABLED=1
Perintah apa saja yang dapat dilakukan terhadap service haproxy dapat dilakukan dengan perintah berikut.
sudo /etc/init.d/haproxy {start|stop|reload|restart|status}
Backup file konfiguras:
cp -r /etc/haproxy/haproxy.cfg/etc/haproxy/haproxy.cfg.bak
Selanjutnya, Buka file konfigurasi tanpa SSL:
nano /etc/haproxy/haproxy.cfg
global

log /dev/loglocal0

log /dev/loglocal1 notice

chroot /var/lib/haproxy

stats socket /run/haproxy/admin.sock mode 660 level admin expose-fd listeners

stats timeout 30s

maxconn 9048

user haproxy

group haproxy

daemon

tune.ssl.default-dh-param 2048


defaults

    logglobal

    modehttp

        option forwardfor

        option http-server-close

optionhttplog

optiondontlognull

        timeout connect 5000

        timeout client  50000

        timeout server  50000

errorfile 400 /etc/haproxy/errors/400.http

errorfile 403 /etc/haproxy/errors/403.http

errorfile 408 /etc/haproxy/errors/408.http

errorfile 500 /etc/haproxy/errors/500.http

errorfile 502 /etc/haproxy/errors/502.http

errorfile 503 /etc/haproxy/errors/503.http

errorfile 504 /etc/haproxy/errors/504.http


frontend HaProxy

  bind *:80

  mode http

  default_backend node


#frontend ssl-HaProxy

  # bind *:443 ssl crt /etc/haproxy/certs/namadomain.pem

   # reqadd X-Forwarded-Proto:\ https

  #acl letsencrypt-acl path_beg /.well-known/acme-challenge/

  #use_backend ssl-backend if letsencrypt-acl

  #default_backend node


#backend ssl-backend

#server letsencrypt *:443 check


backend node

  balance leastconn

  #redirect scheme https if !{ ssl_fc }

  server node1 45.32.15.143:80 check

  server node2 103.74.5.76:80 check


listen stats

        bind *:8080 ssl crt /etc/haproxy/certs/namadomain.pem

        stats enable

        stats hide-version

        stats refresh 30s

        stats show-node

        stats auth username:password

        stats uri /uptime
Ket: huruf tebal bisa seting dan jika non-ssl, bisa hapus bagian kode ssl diatas
- OK, lanjut……………..
Baca panduan: pasang SSL + Haproxy.
Setingan HAProxy include SSL:
global

log /dev/loglocal0

log /dev/loglocal1 notice

chroot /var/lib/haproxy

stats socket /run/haproxy/admin.sock mode 660 level admin expose-fd listeners

stats timeout 30s

maxconn 2000

user haproxy

group haproxy

daemon


defaults

logglobal

modehttp

optionhttplog

optiondontlognull

option forwardfor

option http-server-close

        timeout connect 15s

        timeout client  15s

        timeout server  15s

errorfile 400 /etc/haproxy/errors/400.http

errorfile 403 /etc/haproxy/errors/403.http

errorfile 408 /etc/haproxy/errors/408.http

errorfile 500 /etc/haproxy/errors/500.http

errorfile 502 /etc/haproxy/errors/502.http

errorfile 503 /etc/haproxy/errors/503.http

errorfile 504 /etc/haproxy/errors/504.http


frontend HaProxy-SEOsatu

  bind *:80

  redirect scheme https if !{ ssl_fc }

  mode http

  default_backend node


frontend www-https

   bind *:443 ssl crt /etc/haproxy/certs/nmdomain.com.pem

   reqadd X-Forwarded-Proto:\ https

   acl letsencrypt-acl path_beg /.well-known/acme-challenge/

   use_backend letsencrypt-backend if letsencrypt-acl

   default_backend node


backend letsencrypt-backend

   server letsencrypt *:443 check


backend node

  balance leastconn

 #redirect scheme https if !{ ssl_fc }

  server node1 158.xx.251.xx:80 check

  server node2 103.xx.5.xx:80 check


listen stats

        bind *:8080 ssl crt /etc/haproxy/certs/nmdomain.com.pem

        stats enable

        stats hide-version

        stats refresh 30s

        stats show-node

        stats auth user:passwd

        stats uri /uptime
khusus WordPress: Jika SSL ada masalah redirect [ SSL redirect loop using WordPress and HAProxy ] bisa tambahkan kode pada file wp-config.php
define('FORCE_SSL_ADMIN', true);
define('FORCE_SSL_LOGIN', true);
if ($_SERVER['HTTP_X_FORWARDED_PROTO'] == 'https')
  $_SERVER['HTTPS']='on';
Setiap perubahan data config wajib restart HAproxy:
sudo systemctl restart haproxy
Cek status:
sudo systemctl status haproxy
Setup Node / Backend Server
Install semua node, contoh menggunakan 2 node, masing2 di install web server apache, ubah pada setiap file index.html
Node_app1:
nano /var/www/html/index.html
ubah menjadi : <h2> Server Node #01 </h2
Node_app2:
nano /var/www/html/index.html
ubah menjadi : <h2> Server Node #02 </h2
Jalankan HAproxy:
sudo systemctl start haproxy
Ok, lanjut……
Jika sudah buka browser buka alamat IP_address, selanjutnya reload
Hasilnya setiap reload maka tampilan akan berubah dari node1 ke node2 dan seterusnya.
Duplikasi / Sinkonkan data Node
Semua data node_app1,2 harus sinkron pada saat load balancer bekerja.
Panduan: Sinkronisasi Data(node) Secara Real-Time di Linux
Sedangkan Node_db (database mengikuti setiap node_app) manjadi turunan:
- Node_app_1 > koneksi mysql biasa ke node_db 1
- Node_app2 > konekasi mysql biasa node_db_2
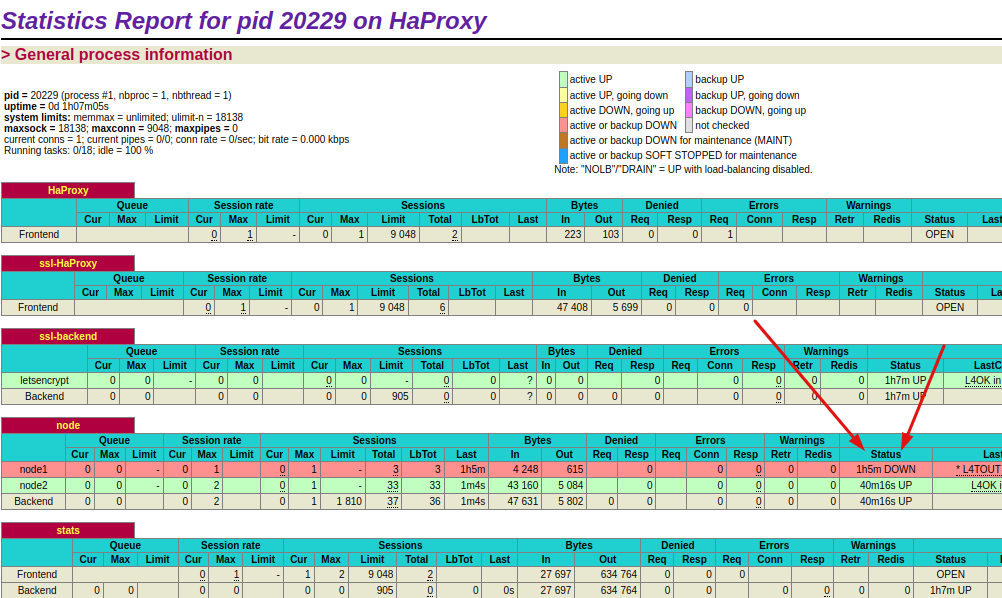
Listen Analisa Uptime.
Buka alamat IP / URL : 20.7.23xxx:8080/uptime
Selanjutnya masukan user & password yg diseting stats auth.